Wilco Airbus Software Module for VRInsight CDU II
How does it work?
First, you must follow the VRInsight installation procedure which installs the hardware device driver (USB Serial Converter), installs the necessary software (especially Serial FP2) and updates the Wilco Airbus panels as required. Follow all the VRInsight procedure to configure the monitors correctly and set up the panels, as explained in the CDU II documentation.


When
this is done, you can load any Wilco Airbus aircraft. The 2D panel
appears with 2 new windows visible: the MCDU II-Display that shows only
the MCDU screen and the MCDU II-Keypad that shows the whole MCDU.
You
can hide the second window MCDU II-Keypad, it is now useless.
Unlike
what is written in the VRInsight documentation, you must not run the
Serial FP2 utility.
Now you will start using the Wilco Airbus
CDU II software.
First time
The first time you use this software, you should see something like this:
Now follow these steps:
|   |
Next
times...
Next
time you want to use the CDU II with a Wilco Airbus aircraft, the MCDU
window may be correctly positioned. If not, do the following:
- Undock the MCDU-II Display window. You don’t have to care about the window position and size.
- Open the software main menu (Ctrl-F8 by default)
- Click the button “Restore MCDU in CDU II
- That’s it, you CDU II is ready to work with the Wilco Airbus MCDU
Instead of steps 2 and 3, you can also press the key associated with this function (Ctrl-F10 by default)
Full Screen Feature
In
order to take advantage of the full screen feature offered by this
software, follow these steps:
- Configure the Windows taskbar in “auto-hide” mode so that it does not appear at the bottom of the screen.
- Configure FS (FS2004 or
FSX) to hide the menu bar:
- FS2004: right click and select “Hide Menu bar”
- FSX: press ALT key for a few seconds - Open the main menu and click the button labeled “Show/Hide FS Main Window Border” or press the key associated to this function (Ctrl-F12 by default)
With no taskbar, no menu bar, no title bar and no border, the main FS window takes all the space on the screen.
Configuration Utility
All the functions of this software are accessible through single key presses. By default, they are defined as shown here:
| Ctrl-F8 | Show Main Menu |
| Ctrl-F9 | Store current MCDU position |
| Ctrl-F10 | Restore MCDU in CDU II |
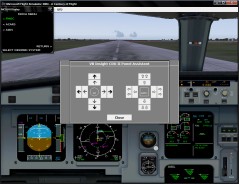
| Ctrl-F11 | Show panel position assistant |
| Ctrl-F12 | Show/hide FS main window border |
You can change the key assignment by running the configuration application.

In the “Keys” section, select a command, the associated key appears below. Click “Change” if you want to change the key. A new window appears to let you define another key.

Press the key that you want to assign or leave “None” if you want to have no key defined.
The configuration utility also lets you specify the COM port number used by the CDU II. Use this feature only if you have a conflict with another hardware device controlled by a COM port. If not, just leave it as “Unknown” and the software will find the CDU II automatically.
If you have to specify the COM port number, you can easily find it with the device manager.

As shown on this example (my personal configuration), you can see I use a CPFlight FCU, which had a conflict with the VRInsight CDU II. Looking at the device manager, I could see the FCU uses the COM port #5, whereas the CDU II uses COM port #7. In this case, I just had to specifiy the port #7 in the configuration utility and all conflicts were resolved.
Registration
At
the end of the
installation process, you are asked to enter your email address and
your key to proceed to registration. If you don’t have a key at this
time, you can use this software for 10 days (trial period).
If
you purchase a key, you can register it later by running the
registration application.
<Image menu démarrer>
You can enter your email address and the key that was provided to you when you purchased the software.

Please
copy and paste the key to avoid any error when entering it (a confusion
between 0 and O is so easy…)
If the registration is
successful, a message appears to confirm this.