Radar v2.0
for FS2004 and FSX

This section explains how the radar can be integrated in FS2004/FSX panels.

Panel Integration

The radar is made of several gauges. For the radar screen, 4 gauges are available for all the radar screen shape and color:
In addition, a set of XML gauges are provided to control the radar:
All these gauges are detailed later in this section.

Radar Screen Gauges

In order to integrate the radar screen in a panel, you need to edit the panel configuration file (panel.cfg) and add the line that describe the radar screen you want to use. This line has the following format, similar to all the lines that describe the gauges used in the panel:

gaugeXX=GaugeName, X,Y,W,H

XX is the number of the gauge. It should be the highest number of existing gauges + 1
Name is the name of the gauge. You will find later the available name for each radar screen shape and color.
X,Y define the gauge position
W,H define the gauge size (width and height)
Setting a size that defines a square radar screen is highly recommended. Otherwise, the radar global mode will display an ellipse instead of a circle.

For more information about panel editing, please refer to the Microsoft Panel SDK.

The following table describes the gauge name you must use depending on the shape and color of the radar screen you want to use:

UsageGauge Name
Rectangular Green radar screenRadar!Rectangular Green
Rectangular Amber radar screenRadar!Rectangular Amber
Circular Green radar screenRadar!Circular Green
Circular Amber radar screenRadar!Circular Amber

Example:

gauge12=Radar!Rectangular Green, 52,412,150,150

In this example, a green rectangular radar screen is used, positioned at 52,412, and its size is 150 by 150.


Radar Control Gauges

These gauges let you control the radar, that is change its mode and range. They are provided as XML gauges so that you can read the source code, and edit it if necessary. If you have a look at these XML gauges, you will see they are extremely simple. Their role is just to update some XML variables used by the radar to manage the display.
Some gauges use background bitmaps, provided as samples. Other gauges use transparency, so that you can use them on top of your panel graphics without any impact on the display.

The gauges are located in the following directory: <FS Intallation Directory>\Gauges\RadarControl

The following table shows how these XML gauges can be used in your panels:

File NameName to use in panel.cfgRoleIcon
Global Mode.xmlRadarControl!Global ModeSets the radar in the global mode
Transp Global Mode.xmlRadarControl!Transp Global ModeSets the radar in the global mode, uses transparencyNone
Horizontal Mode.xmlRadarControl!Horizontal ModeSets the radar in the horizontal mode
Transp Horizontal Mode.xmlRadarControl!Transp Horizontal ModeSets the radar in the horizontal mode, uses transparencyNone
Vertical Mode.xmlRadarControl!Vertical ModeSets the radar in the vertical mode
Transp Vertical Mode.xmlRadarControl!Transp Vertical ModeSets the radar in the vertical mode, uses transparencyNone
Transp Off Mode.xmlRadarControl!Transp Off ModeSwitches the radar offNone
Radar Mode Switch.xmlRadarControl!Radar Mode SwitchSwitch to increase/decrease the radar mode
Transp Horizontal Mode Switch.xmlRadarControl!Transp Horizontal Mode Switch.xmlTransparent switch to increase/decrease the radar mode
Horizontal layout
(click on the left/right to increase/decrease mode)
None
Transp Vertical Mode Switch.xmlRadarControl!Transp Vertical Mode SwitchTransparent switch to increase/decrease the radar mode
Vertical layout
(click on the top/bottom to increase/decrease mode)
None
Radar Range Switch.xmlRadarControl!Radar Range SwitchSwitch to increase/decrease the radar range
Transp Horizontal Range Switch.xmlRadarControl!Transp Horizontal Range Switch.xmlTransparent switch to increase/decrease the radar range
Horizontal layout
(click on the left/right to increase/decrease mode)
None
Transp Vertical Range Switch.xmlRadarControl!Transp Vertical Range Switch.xmlTransparent switch to increase/decrease the radar range
Vertical layout
(click on the top/bottom to increase/decrease mode)
None


Important Note:

In order to be able to control the radar with the keyboard (as explained here), you must integrate the RadarControl!Keyboard gauge anywhere in the main panel, like this:

gaugeXX=RadarControl!Keyboard, 0,0,1,1

The number of the gauge (XX) has no importance. Its position and size are not important either because this gauge does not appears on the panel.

Integrating the Circular Radar

The integration of the circular radar screen requires a specific panel processing. It is not complex, but it needs to be explained through an example. This example shows how we can use layers in a panel design.

Imagine you want to place the radar in this panel, at the circular location shown in red:


In the panel.cfg file, the main panel window is usually described in a section named [Window00], which indicaes it is the first window of the panel. As it is the first window, all other panel elements will be displayed on top of it. In this example, the content of the panel.cfg file may look like this:

If you modify the panel.cfg to include the circular radar gauge using "Radar!Circular Green" or "
Radar!Circular Amber", the content of the panel.cfg file may look like this:


This is typically what we want to avoid because the radar screen corners are still visible, as shown here:

Bad integration of the circular radar. The corners are still visible.

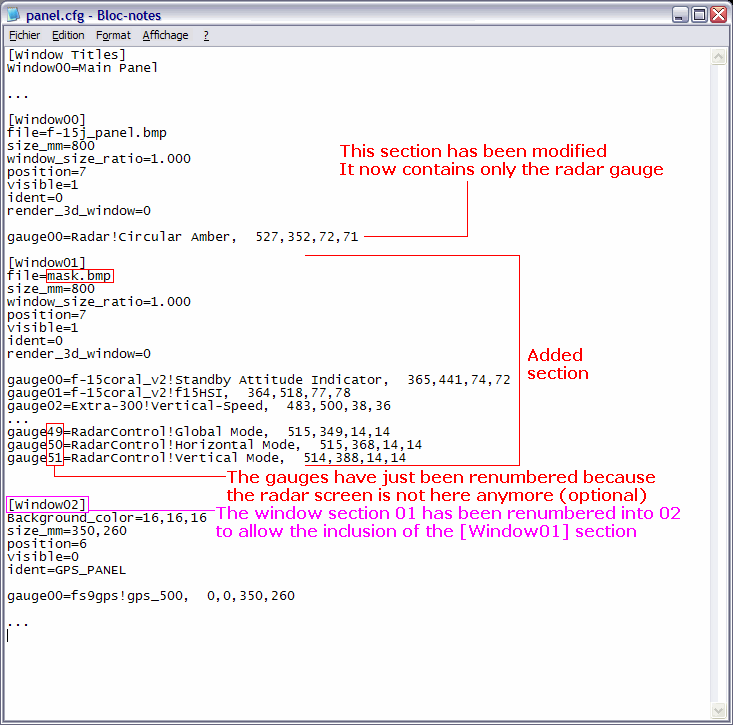
In order to avoid this, you just have to create an additional image. The goal is to use this new image as a mask to hide the radar corners. Follow the instructions here:
The result is much better, according to what was expected...

Result


Replacing the old radar in existing panels

The old radar was used in the Mirage 4000, F-16 and Super Etendard (SEM) panels. Replacing the old radar with this new one is very easy. You just need to edit the panel.cfg file and change some lines in it.

Existing panelfind this...Replace it by...
Mirage 4000M4000!RadarRadar!Rectangular Amber
M4000!Radar ModeRadarControl!Transp Horizontal Mode Switch
M4000!Radar RangeRadarControl!Transp Horizontal Range Switch
F-16
F16!RadarRadar!Rectangular Green
F16!Radar ModeRadarControl!Transp Horizontal Mode Switch
F16!Radar RangeRadarControl!Transp Horizontal Range Switch
Super EtendardSuperEtendard!RadarRadar!Rectangular Green
SuperEtendard!Radar ModeRadarControl!Transp Horizontal Mode Switch
SuperEtendard!Radar RangeRadarControl!Transp Horizontal Range Switch

You just need to change these gauge names, and don't need to change any gauge size or position.